

Can You Repair Worn Worn-out Boots
How to repair Ubuntu if it won't kicking
Fix startup issues
Beginning-up bug. That moment when – having expected yourself to be getting on with your day's work or entertainment – y'all find yourself staring at a cryptic fault message, or fifty-fifty worse, a blank screen.
No matter how many times y'all press reset or restart, the same bulletproof barrier blocks your path. So, what can you practise? Start-up issues come in all shapes and sizes, and they can be difficult to track downwards.
There are, however, some sound principles to use that will resolve many errors, and in this tutorial, nosotros're going to look at the tools and techniques required to troubleshoot well-nigh start-upwards problems. You should offset by examining how the kicking procedure works.
This reveals that the kick process tin can be split into three broad stages centred around the Chow two boot loader: pre-Grub, Grub and mail-Grub. Knowing this allows you to focus your troubleshooting efforts based on where in the procedure the mistake or freeze occurs.
Permit's start at the start. You switch on your PC. If power comes on, simply aught else happens, chances are yous've a hardware result to sort – if yous recently poked around the innards of your PC, and then check everything is connected correctly.
If not, unplug all external devices except your keyboard and try again. If this doesn't piece of work, open the example carefully and disconnect your internal drives besides. If the figurer now boots to the splash screen, y'all tin can try reconnecting the internal drives and trying again; if you lot're at present able to boot to the login screen, shut down your PC and beginning reconnecting your external peripherals to run across if the problem has cleared itself or can be targeted to a single device, in which case endeavour a dissimilar cablevision, or go online and Google for known kicking problems involving that device.
If you lot're lucky, your motherboard will emit a series of beeps or flashing lights you tin can employ – once again by enlisting the help of the internet – to identify the likely problem. This may involve replacing a component or something more drastic.
If you're able to get as far equally your PC's splash screen, simply so your figurer hangs or a 'missing operating system' error bulletin appears, then first think back to any recent changes.
If you've overclocked your PC, eg, y'all should at present enter the system EFI or BIOS and await for the option to load fail-safe defaults. Endeavour rebooting again.
If this fails, so the problem is likely to exist with your difficult drive, and and so the starting time places to look are the MBR and Chow. If Grub isn't set to automatically appear when your PC starts, try rebooting while holding the Shift primal or tapping Esc to bring upwardly the Grub boot menu to confirm it's not able to even load itself.
Spring to the Kick-Repair tool section one time you've verified it'south nowhere to be found.
If Chow is able to load, but can't observe any bootable OS you'll detect yourself with a number of scenarios: you may be presented with a basic command prompt such as grub> or grub rescue>, which indicates one or more than files required by Grub are missing or decadent.
Yous may become a specific error message or frozen splash screen, or you lot may just see Grub and nothing else, indicating it can't even find the about basic data required to proceed.
If you printing C you may exist able to enter the Grub Last way to perform basic checks and repairs – you lot can attempt to manually initiate the kicking by pressing Ctrl+Ten or F10, eg, or use the set command to review current settings and change basic settings such as the graphics mode.
If the Grub card appears, then the issue may lie with its configuration file if things immediately grind to a halt afterward you lot select a card option, but if Linux does offset loading before grinding to a halt, the problem will lie with your operating system, in which case skip to the Post-Grub troubleshooting section.
If you're struggling to fix Grub issues by hand, or there's no sign of Grub on your system at all, and then you'll need to enlist the services of your rescue media and the Boot-Repair tool, which works with all Debian-based distros, including Ubuntu.
The Boot-Repair tool itself will launch automatically when you lot kick from a Kick-Repair tool disc, but if you lot're unable to create information technology, but have access to a Linux installation disc, use that in a live environment instead, and so grab the Boot-Repair tool using the post-obit commands:
$ sudo add-apt-repository ppa:yannubuntu/boot-repair
$ sudo apt-become update
$ sudo apt-get install boot-repair
$ boot-repair
The Boot-Repair tool is focussed on those early boot bug caused by the hard drive'south boot sector, MBR and Chow. It basically provides a convenient and user-friendly graphical forepart-end to the tools required to gear up many problems.
The tool offers a 'Recommended repair' option that promises to fix most frequent bug, or you can click 'Advanced options' to see what information technology tin can do and manually select specific fixes without getting your hands dirty in the Terminal.
The step-by-step guide (see Tweak Boot-Repair tool Settings afterward in this guide) reveals what repairs and tweaks are possible, but note the tool is context-sensitive, and some options may be greyed out or missing depending on your setup.
The tool automatically generates a log of your organisation and that it attempts to do, which y'all tin and so share on the Ubuntu user forums if necessary. Before attempting any advanced tweaks on your own, information technology pays to try the recommended option get-go, and so ask for help on the forums using the output logs generated – this will ensure you choose the correct pick and don't crusade more damage.
The Kick process
When you press your organization's power button, control is initially given to your PC's EFI or BIOS, which starts its various components, performs bones diagnostics tests and attempts to discover a bootable device, which is typically the kickoff hard bulldoze.
Once located, the BIOS or EFI looks for the Chief Boot Record (MBR) at the very start of the drive, which has a tiny program inside that loads the adjacent stage of the boot loader, reading a file (eg e2fs_stage_1_5), which in turn is able to load the Grub boot loader.
A 'missing operating system' mistake at this betoken ways you need your rescue disc for diagnostics equally something is missing – either in Grub, the MBR or the drive itself. Once Chow loads successfully information technology reads a file chosen menu.lst, which contains the list of choices you lot run into in the boot bill of fare. Each entry basically identifies the drive, partition and file that contains the Linux kernel, plus RAM disk file used past the kernel as it boots.
The entry volition also contain whatsoever additional parameters passed to the kernel. Control is now passed to the kernel, which attempts to mount the root file arrangement. This is a primal moment, and if it fails y'all may get a kernel panic, or things might grind to a halt. If successful, it'll create a single process to run the /sbin/upstart file (other distros use init) – if this goes wrong, you'll go a panic, it may halt once again or drib you lot into a root shell.
At this point, upstart starts running scripts and upstart events to start other services and eventually bring you to the logon screen.
Your rescue disc will also come up in handy should you non even get as far as Grub loading. Once booted, verify the existence and land of your hard drive.
Open the file director and see if your partitions are visible and if yous tin can access the files on them – this is a good fourth dimension to support any precious files earlier you go along further.
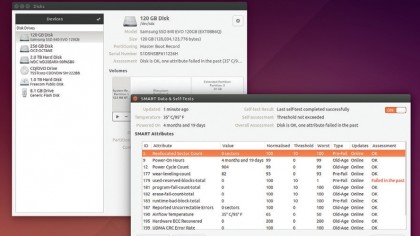
If nothing shows up, check whether the hard drive has been detected past opening the Disks utility from your Ubuntu Live CD – if you're using a Kicking-Repair tool CD, you'll need to install the gnome-deejay-utility through the Synaptic Packet Manager under System Tools.
One time installed, open up it via the Accessibility menu. The Disks tool lists all physically attached drives – if yours isn't visible, you may find the drive has failed, in which case yous'll be reaching for your latest fill-in afterwards shelling out for a bulldoze replacement, or starting again from scratch with a fresh Ubuntu installation and new-institute love of bankroll up your system.
Assuming your drive does show up, select it from the left-mitt carte du jour where yous tin can examine the partition table plus check its physical health via its SMART attributes. Don't panic unless the drive is accounted on its terminal legs, simply do focus your next bank check on the partitions themselves.
If you run the Boot-Repair tool, its recommended settings will include a total disk check, but yous tin can manually perform this bank check yourself using GParted, which is on both rescue discs. GParted enables you to see how your partitions are bundled, as well as revealing which ane is the boot.
Right-click this and verify Mount is greyed out before choosing 'Check to schedule a disk check using the fsck tool'. This will bank check for and try to repair any problems it finds equally soon as you click 'Employ', just it'due south important the partition isn't mounted before the check is run. Also give information technology as long every bit information technology needs to complete – this could take hours or fifty-fifty days in some extreme cases, and cancelling or aborting will almost certainly corrupt the sectionalisation.
Make sure the check is run on all partitions on the kicking drive. In nigh cases, bold the bulldoze isn't physically damaged or corrupt beyond repair, running these tests should ensure you're able to at to the lowest degree get Grub working over again.
Have a neglect-safe backup
It may seem strange, just if you're struggling with start-up issues, you should endeavor to have a fill-in of your hard drive earlier you perform any repairs – this means if you mess things up completely y'all can always roll back your organisation to the state it was in when the start-up problem commencement manifested itself.
Of course, if yous're diligent and you support your system regularly, you could always simply curlicue things back at present to a working state, although carry in mind at that place may be data loss involved if your home binder is on the same partitioning equally your Linux installation (as is the case with default Ubuntu installs).
You'll need a suitable backup device – typically a USB-connected hard drive – and a tool that takes a complete drive image of your organisation. The dd control-line tool can be used from both Ubuntu and Kick Repair Tool live CD environments, but the backup drive needs to exist at least the aforementioned size – and preferably – bigger than the drive you lot're copying.
At the other end of the complexity scale is Redo Backup & Recovery. You'll need a blank CD or DVD to burn its 261MB ISO file to, but it provides an like shooting fish in a barrel to follow graphical UI.
If you find that Chow appears to exist working fine, simply your problems begin when yous attempt to load Linux itself. Try switching to verbose mode during kicking by pressing the Esc key to see if any clues appear in the messages that scroll past (or if it hangs at a certain point).
Brand a notation of these and exercise a search online for them for more communication. If this doesn't happen, concord Shift at boot to bring up the Grub menu if necessary, then select 'Avant-garde options' followed by '(recovery manner)', which will launch Ubuntu in a minimal state, plus mount the file system in read-simply mode.
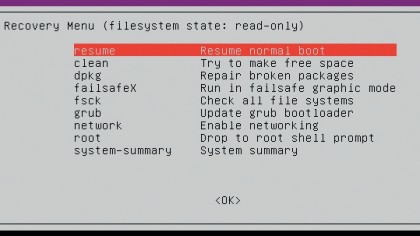
If this is successful, after a succession of scrolling messages you should find yourself presented with the Recovery Menu, offering nine options. The options are all pretty much self-explanatory – the clean selection may be of employ if your difficult bulldoze is full, which can cause kick problems.
If your problems started considering a package failed to install properly, then dpkg volition repair it and hopefully get things working once again. The failsafeX option is a useful if you notice yourself booting to a black screen or the graphical desktop doesn't appear to be working correctly – it basically bypasses problems with your graphics drivers or X server to give you a failsafe graphics way to troubleshoot your problem from.
We've touched on fsck already – this volition check the bulldoze for corrupt files, which tin can clear many errors, particularly if your PC crashed and has failed to boot since. The grub choice isn't relevant unless you've used Grub's ain recovery tools in place of the Kick-Repair tool to get this far in the boot process – selecting this volition make your changes permanent.
Employ the network pick to re-enable networking, and the root option to driblet to the shell prompt, allowing you lot to troubleshoot directly from there. If doing so, be sure to mount the file system in read/write mode using the following command:
mount -o remount,rw /
You can too laissez passer temporary kernel parameters to Ubuntu during the boot procedure, which may assist in some scenarios.
With your chosen operating system selected in Chow, press the due east cardinal to edit the kernel file. Scroll down to the line beginning linux – parameters are added to the end of this line after repose splash . You'll demand to brand sure that you get out a infinite between each parameter. Once done, printing Ctrl+X to kicking with those parameters. Annotation that any parameters you add hither are temporary –
in other words, they're removed the adjacent time you lot kick, and then you can experiment until you observe a solution that works, then – if necessary – make it permanent by editing the Grub configuration file (sudo nano /etc/default/grub).
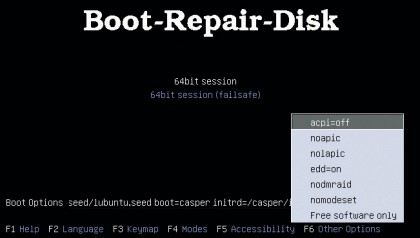
Y'all can also pass parameters from the live CD environment using the Boot-Repair tool using the 'Add a kernel option', which includes 15 common parameters that tin can aid with troubleshooting. Examples of these include acpi=off, which disables the ACPI system that's known to cause random reboots or arrangement freezes on certain PCs, and nomodeset, which instructs Ubuntu to only load graphics drivers subsequently the X environs has been loaded, and not earlier.
These temporary parameters can be passed to your rescue disc too, in instance yous're having problems getting that working. Printing F6 at the initial kicking screen to cull from the options on show. For more information on specific parameters, do an online search for the parameter.
Repair install
At that place's one last thing you tin try from the Grub boot menu – if your kernel has been upgraded, it'south possible to kick using an older version of the kernel from the Advanced options screen under Grub. You lot'll see each version of the kernel listed – try the previous version if you believe your boot problem is linked to the latest kernel.
If this works, you tin make the version you've used permanent by editing the Grub configuration file – the simplest style to exercise this is by using the Kick-Repair tool.
If things look particularly bleak, then you may have luck reinstalling Ubuntu over the top of itself. Kicking from the Ubuntu Live CD and choose the option to 'Install Ubuntu' when prompted. When you lot get to the 'Installation type' screen you'll be presented with a new option, pre-selected by default: 'Reinstall Ubuntu…'
This option basically reinstalls Ubuntu without touching your home folder or sectionalization, which means not only should your documents and other files be preserved, simply key settings and many programs may be left solitary too. It'll also exit entries in your boot menu alone, ensuring you lot won't lose access to other operating systems.
What volition be replaced are organisation-broad files, which will hopefully root out any corrupt ones and get your PC up and running once again. Although it doesn't touch on your files, it's still proficient practice to back up the drive – or at least your dwelling house folder or segmentation – before y'all begin.
To ensure you don't lose anything from your system, make sure you recreate all user accounts with the same login and password, including – of course – your own during the install process.
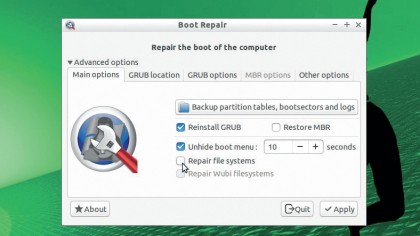
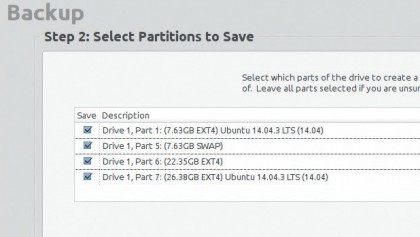
1. Main options
The start tab offers a user-friendly button for backing upwardly your current partition table, boot sector and log – click this to copy this key information. It's likewise where y'all can reinstall Grub, restore the MBR and choose whether to hibernate the Chow menu.
If y'all remember your filesystem is corrupt, tick 'Repair file systems' to have it checked and fixed.
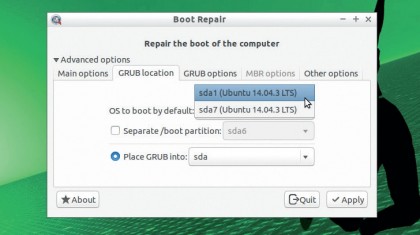
2. Grub location
This tab allows you to specify which OS to boot by default in a multiboot setup. You can also choose to place Grub in its ain separate /boot partitioning if y'all wish – typically this is only needed on encrypted disks, drives with LVM set or some older PCs.
The terminal option specifies which bulldoze Grub itself will be placed (sda past default).
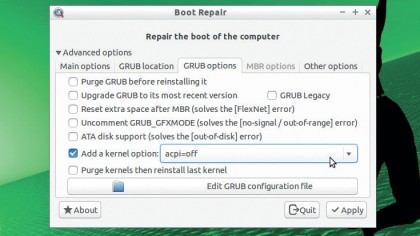
3. Chow options
This department opens with options for making certain Chow is updated to its latest version. There'southward besides three specific fault fixes offered. You tin can likewise add new kernel options to the Grub carte here, or purge all previous kernels before reinstalling the last one.
You lot may fifty-fifty see an selection assuasive you to edit the Grub configuration file directly.
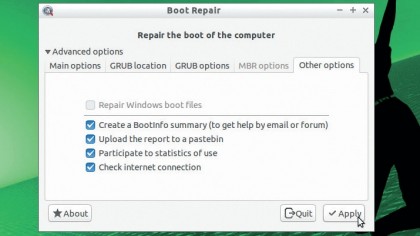
iv. Other tweaks
If the MBR options tab isn't greyed out, use information technology to restore your MBR from a backup and choose which partition gets booted from information technology. The final Other options tab offers an opportunity for repairing Windows files (irrelevant in most cases) and provides options for pasting a summary of your settings online for reference.
- Enjoyed this commodity? Expand your knowledge of Linux, get more from your code, and discover the latest open source developments within Linux Format. Read our sampler today and take advantage of the offer within.

Can You Repair Worn Worn-out Boots,
Source: https://www.techradar.com/sg/how-to/computing/how-to-boot-repair-ubuntu-1315203
Posted by: lattimoredected.blogspot.com
0 Response to "Can You Repair Worn Worn-out Boots"
Post a Comment